Using the Editor
We recommend you use the code editor that’s included with Shepherd to program your robot. You can either program in Python or use Blockly, a Scratch-like programming tool.
Assuming you’ve connected to your robot, head to http://robot.local/editor or click the orange editor button on the Shepherd homepage.
The Editor Interface
You should now see the editor interface. (yours will look slightly different to this)
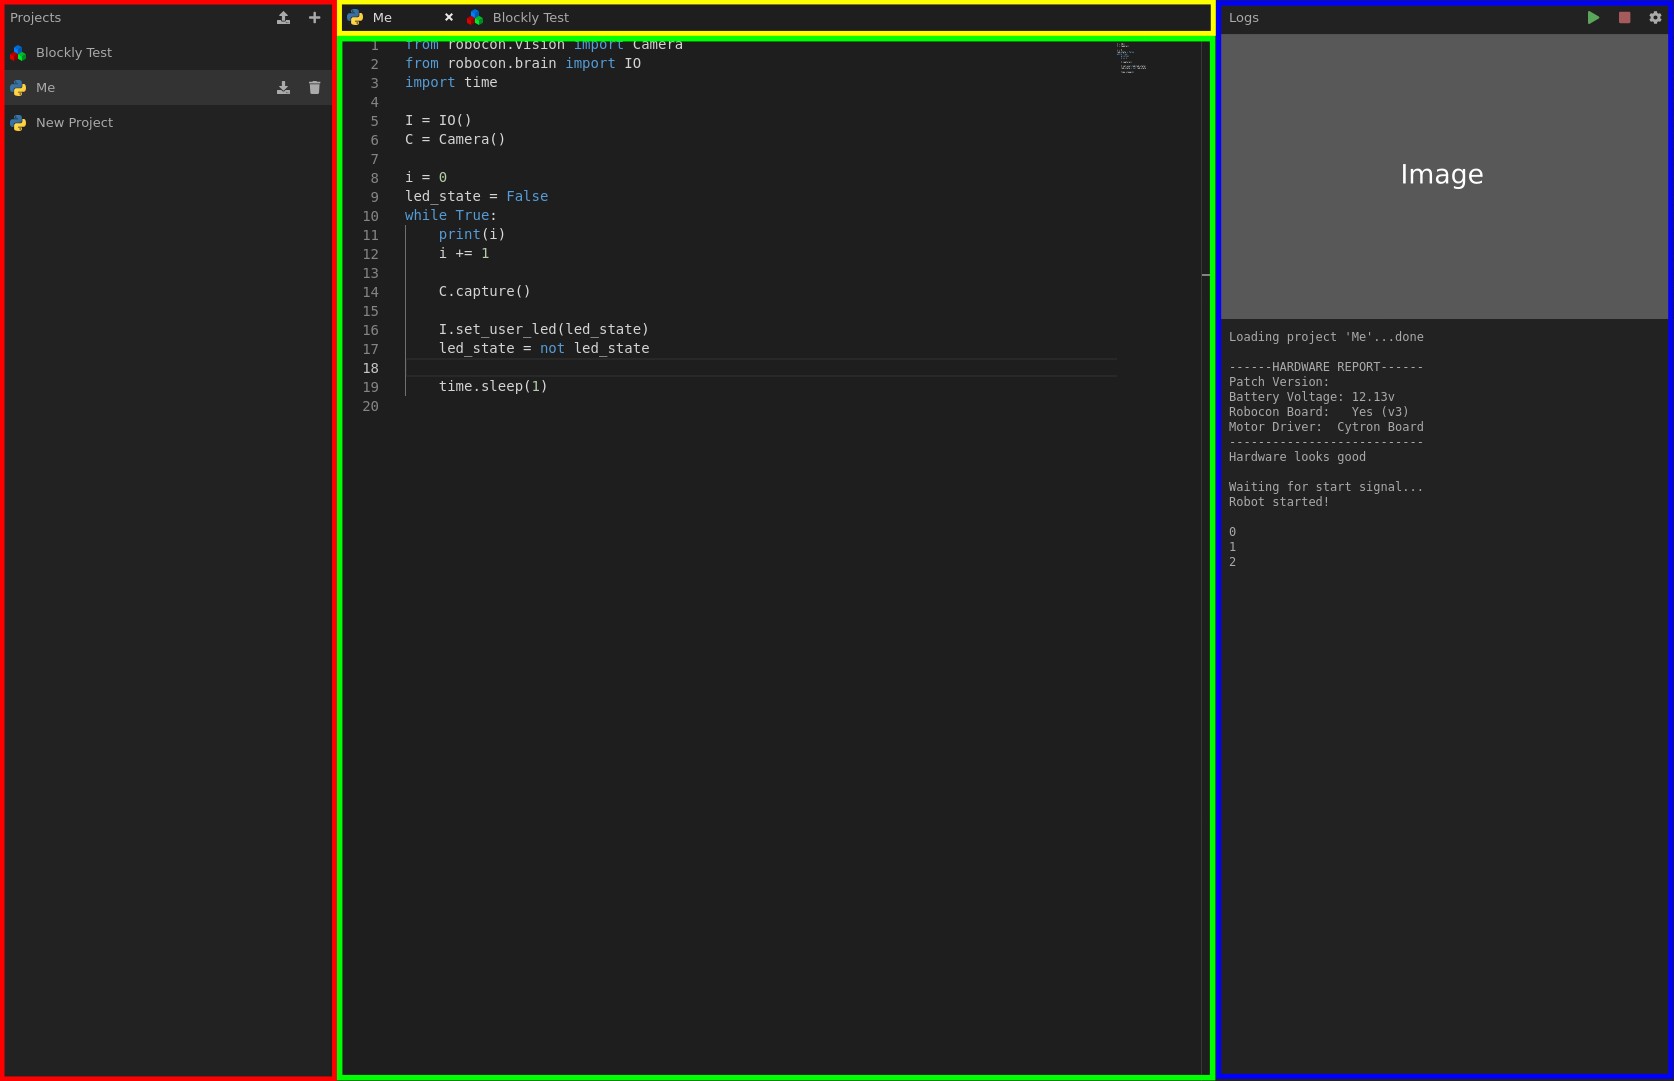
The red sidebar is the projects panel. This is where you can access or export your existing projects, and create or import new ones. Clicking on a project in this list will open it in the editor.
-
In the top-right corner of the projects panel are:
- The import button, allowing you to load saved projects into the editor.
- The create project button, which creates a project.
-
On each project listed in the projects panel, there is:
- The export button allowing you to save the project on your computer as a backup.
- The delete project button, deleting a project if you no longer need it. This cannot be undone.
The yellow toolbar is the tab list. This is where you can find all your open projects. If your project has a white circle at the end of the tab, it means you have unsaved content. Projects are auto-saved after you stop editing them or when you run your project, but you can also manually save by pressing the CTRL and S keys simultaneously.
The blue sidebar is the logs panel. This is where you can see the output from your robot when you run your program.
- In the top-right corner of the logs panel are:
- The run button. This will save thr project to your computer as a backup, and will then run the project code on your robot.
- The stop button. This will stop any code that is currently running on your robot.
- The settings button. This opens the settings panel.
The green section in the middle is the editor. This will be different depending on whether you’re editing a Python or a Blockly project.
Creating a new project
Click on the create project button. The create project dialog will appear:

Give your project a name, then select the type of project you would like. Choose either Python or Blockly. Then click the create button.
Your new project will open in the editor. See the sections below for more information on Python and Blockly projects. Once you’ve read these, why not start learning how to program your robot.
Python Projects
Python projects provide a powerful development tool with syntax highlighting, standard Python libraries and also the robocon module. If you are interested, it uses the text editor that powers Visual Studio Code.
Blockly Projects
Google’s Blockly is a programming environment similar to Scratch that allows you to program your robot with blocks. You still have access to all the features of the robot so you are not disadvantaged if you decide to use this over Python.
Using the Settings Panel
The settings panel controls various aspects of how your code is run:
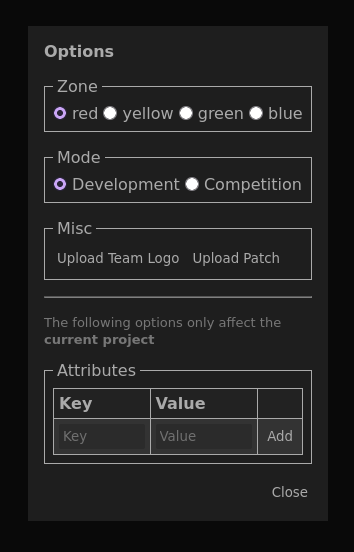
The settings panel allows you to configure:
-
Zone: the coloured zone in which the robot is being run, this can be used to test the behaviour of your robot when run in different zones of the arena.
-
Mode: the mode in which your code is run, “competition” mode adds a 180 second time restriction before your code will be terminated, as it will in the competition arena. “development” does not have this restriction.
-
Project Attributes: project-specific settings, see project attributes for more information.
The settings panel also has buttons for updating your team image, and patching your robot.
Project Attributes
In the settings panel, project attributes can be configured. These control various aspects of how a project is run, including initial servo positions and power state. See their respective sections of this documentation to find out more information.
Configuring project attributes is not available if you do not have a project selected in the editor.
Updating your team image
When the robot boots, it loads a default image which is displayed until the robot takes a picture, in the arena these images may be displayed on an overhead projector. You can change the default image.
- Produce your image in JPEG format.
- While connected to the BrainBox, navigate to http://robot.local on the web browser and navigate to the editor.
- Open the settings dialog via the settings cog in the top-right corner.
- Select “upload team image”, select the JPEG image you produced, and press OK.
- Rebooot your robot using the power switch.
- Reconnect your robot and go back to the editor, wait a few seconds and you should see your new logo!
Other
- The “logs” and “projects” sidebars can both be resized, which may allow you to see logs and images more clearly.
- You can expand the current shown image by pressing the small icon that displays when hovering over it.